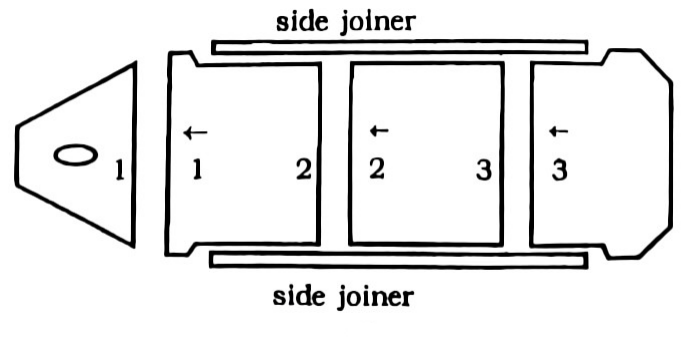
With each boat there are two side-joiners which you have to place at the sides of the floorboards in the savings. These joiners make sure that floor is stabilized even with waves.
How to place the floor boards
A. Assembly for boats with inflatable floor
1. Unfold and stretch out the floor onto the bottom of the boat, edging it under the half-inflated tubes and against the transom. The valve must face upwards.
2. Inflate the floor up to 3/4.
3. Finish inflating the boat.
4. Finish inflating the floor.
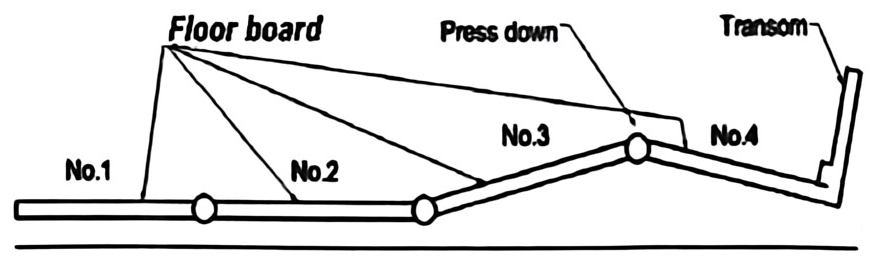
B. Assembly for boats with an aluminum floor
1. Insert front floor board No.1 in bow of boat.
2. Insert floor board No.4 in transom of boat.
3. Insert floor board No.2 into floor board No.1
4. Insert floor board No.3 into floor boards No.2 and 4 and press down until flat.
(see drawing 3)
You will notice that the first couple of times you place the floor boards it will not go easy. After a while it will all go easier because the material shall stretch.
 drawing 3
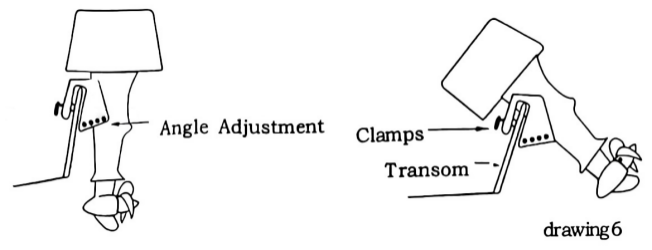
How to set Motor Mount
In case of Dinghy boat series, set the mount when inflated only half. It is difficult to set the motor mount when fully inflated.
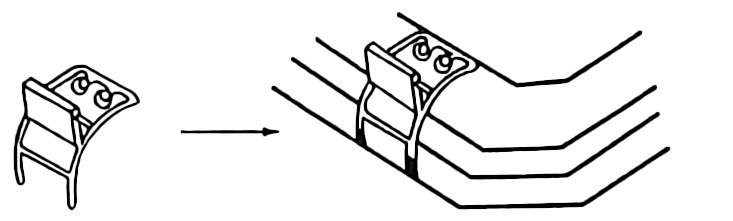
How to place the side joiners
To make the placing of the side joiners easier you have to put an oar together.This oar consists of 2 parts which you have to put together by sticking them in each other.
Place an oar underneath the boat at the side where you are going to put the side joiner. Because of placing the oar, there will be some space between the fabric and the floorboards. Now it is easier to place the joiner. Now place the side joiner in the saving by placing your hands on each end of the joiner. Push gently until the whole joiner is around the floorboards.(See drawing 5) Do the same at the other side.
 drawing 5
To inflate
Start to inflate the boat. We advise you to this with the foot pump that is delivered with the boat.(Do not ever use a high-pressure pump unless high pressure air deck floor board)
Start inflating both tubes. Then inflate the nose. After you have inflated these three compartments you can start inflating the keel, make sure that you inflate the keel hard.
Now close all the front caps of the valves, place the oars and your boat is ready
to sail.
TIP:Do not inflate the keel until floorboard s are installed.
Attention:Make sure you never exert to much pressure on the air chambers when the boat is exposed to the sun, because air will increase with warmth which can cause overpressure,(1℃=Causes a changing of 0.004 bar pressure) When the temperature goes down, the pressure goes down also.
Self draining
All types are provided with a self-draining plug at the bottom of the transom.When you take out the black plug, the self-draining system, make sure that water can go out of the boat but will not come in through the draining valve. So make sure you have pulled out the black plug when you are sailing or towing the boat. It is important to regular clean the self-draining system from dirt.
Using an outboard motor
When you use an outboard motor, make sure you place it on the aluminum bracket at the transom and tightly screw the butterfly nuts of the outboard-motor. Fasten the outboard-motor to the aluminium bracket. Check after 15minutes of sailing
if the outboard-motor still firmly connected to the transom.
Important:Do not ever exceed the maximum recommended engine-power the is written on the back of the transom.
Using oars
Our inflatables are extremely suitable to row with. Be careful when there is strong wind and you are sailing a boat without a keel.
Towing
Our inflatables have three towing-rings. When you are towing the boat, it is the best to use all 3 towing-rings, this way the tractive power is divided. It is also not allowed to have ballast in the boat when you are towing. Make sure that you use extra towing-ropes when you are towing during bad weather. The length of the towing-ropes must be adjusted to type of boat that you are towing and the weather circumstances.
Loosing pressure
For an inflatable boat is standard designed that it may not loose more than 20% of the air in 24 hours. When this does happen, do the following.
1. check if all valves are screwed tight.
2. Check if all valves are clean.
3. See if you can find any damaging.
4. Check the seams.
5. Put some soapsud on the boat to discover small leaks
Due temperature difference the pressure can increase or decrease
Contact: yilia
Phone: 15618076237
Tel:
Whatsapp: +86 15618076237
Email: yilia@mervistamarine.com
Add: No. 72 Wangtan Road, Wangcheng Sub-district Office, Laixi City, Qingdao City, Shandong Province


